Digital Photo Tip: Get Organized
Are you one of those photographers that dump all your photos into one “My Photos” folder on your computer without any organizing structure? If so, make getting your photos organized so you can find them one of your New Year’s resolutions for 2016.

Students in my photo workshops often ask me how I’m able to find all of the photos in my library. I’m a believer in having multiple levels of organization, from the physical way images are stored to detailed captions and keywords. This month I’ll address the bottom layer — physical organization — for digital files. There’s more than one way to address the problem, so figure out what’s going to work best for you in actual practice. The best system in the world is useless if you don’t use it.
I organize my photos on my computer’s hard drives by year, major subject, sub-category, and version. It’s not a perfect system, but it works pretty well and makes my backups logical. I use Adobe Lightroom’s Library module (as well as a FileMaker Pro database) as a cataloging tool to help me find my images, but that’s a subject for another month.
Because I make my living as a photographer and never know when I’ll need to access any particular photo, I keep my entire digital library on large internal hard drives inside the case of my desktop computer. I currently have two 2- and two 4-terabyte drives dedicated to photos. They’re backed up to external drives and to a large NAS (Network Attached Storage) array.
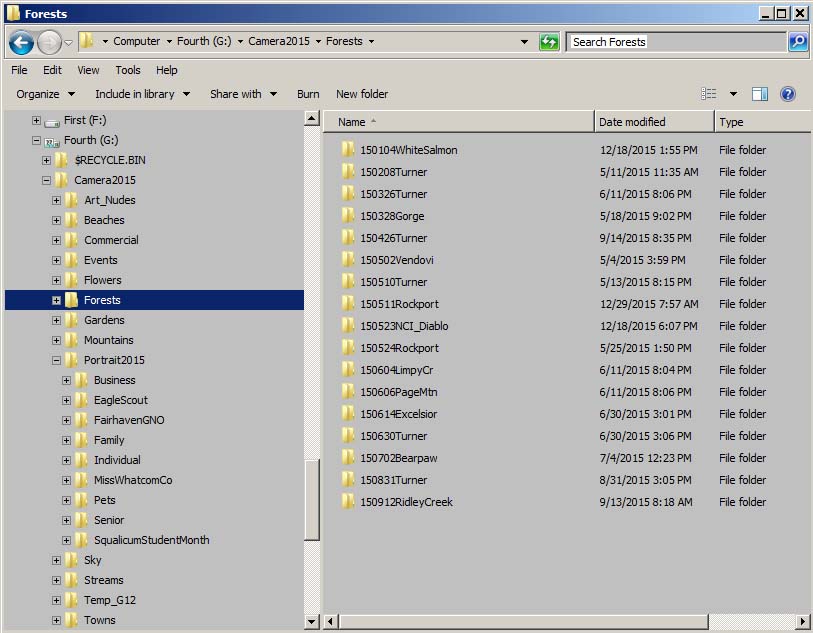
At the beginning of each year, I make a new master folder for everything I’m going to create that year. This year’s folder is named Camera 2016. Last year’s was Camera 2015, and so forth back to when I started shooting digital in 2003. I use “Camera” in the folder name to distinguish from scans I make from slides in my library; those folders have names like Scans_1999.

Inside the current year’s master folder, I create folders for my major image categories. In practice, I don’t create the folders until I shoot something that should be filed there so I don’t have a bunch of empty folders to confuse me. Here are my main categories (yours will likely be different because we photograph different things)
- Beaches
- Commercial
- Events
- Flowers
- Forests
- Gardens
- Mountains
- Portrait2016
- Sky
- Streams
- Towns
Some of these folders get sub-category folders. I consider my real estate photography an element of my commercial work, so it goes there. I break down my portraits into Business, Family, Individual, Pets, and Senior, plus a few special portrait projects.
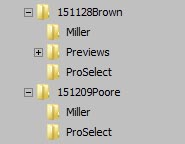
The next level of folders is for individual jobs or days of shooting. When I photograph your business portrait on January 21, the camera files will go in their own folder with this path:
Camera2016 > Portrait2016 > Business > ClientName160121

After I’ve edited your portrait and created the deliverable files they’ll go in a sub-folder I call Processed. Other finished files might go in sub-folders called Web, Previews, or Miller (the name of the professional lab I use for prints).
I’ve followed this consistent filing structure for a dozen years now. It’s based in large part on the physical notebooks of 35mm slides I began using in 1993 when I first got serious about filing my images. For film, I didn’t organize by year, just using the major subject categories.
Exactly how you structure your photo library is a personal decision. There’s no single right way to do it. The important thing is to give some thought to how you’ll want to retrieve your photos, develop your system, and then stick to it. If you’ve got a huge backlog of photos from previous years, start with your new work and then slowly get your older work into your system. Take small steps and don’t let the size of the task prevent you from getting started.
About that collage at the top … the photos are all in the Washington Wildflowers smartphone app. I created the collage with an online tool at photovisi.com. You can get collages without the watermark for a little bit of cash.

