Digital Tip: When One Exposure Is Not Enough
![1204906 John Day River [panoramic merged] [Juniperus occidentalis]. OR 19, Kimberly, OR. © Mark Turner 1204906 John Day River [panoramic merged] [Juniperus occidentalis]. OR 19, Kimberly, OR. © Mark Turner](/wp-content/uploads/2013/03/1204906_pan.jpg)
John Day River valley, merged panorama
I’m a big fan of doing all the necessary preparation work to capture my vision in a single exposure, with all the elements in place in the instant the shutter is open. But sometimes that just isn’t possible and I rely on some of the digital magic that allows me to combine multiple exposures into a single finished image.
There are three main reasons I’ll create a composite image:
- Subjects, particularly in a large group portrait, don’t all cooperate at the same time
- The brightness range in the image is greater than my camera’s sensor can accommodate
- The subject is too large, or the working space too small, to fit into one frame
The key to creating a composite digital image is planning ahead. It’s not something you can do successfully, and believably, without knowing where you’re going. I always use a tripod so as many elements as possible line up perfectly.
Unless I’m going to use High Dynamic Range (HDR) techniques to fit a wide brightness range into a single frame I make sure my exposure is that same for each frame that I’ll be blending. That almost always means manual exposure and a constant aperture. I don’t touch the zoom on my lens and I keep my lighting the same.
Let’s examine each of these three variations on blending multiple exposures.
Blending Subjects

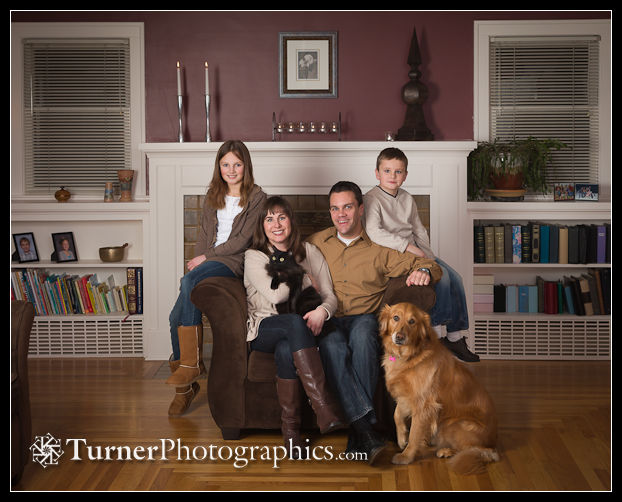
Morse family portrait
I photographed the Morse family in their home last month. We knew up front that we’d be unlikely to get the cat, dog, and two kids all looking good at the same time so we planned to photograph the family with the cat and dog separately and blend them later. When I met Lisa after doing my retouch and finishing work to help her choose a frame she was amazed at my ability to blend the pieces into a beautiful finished portrait.
High Dynamic Range
![1200167 Lost Lake, framed by Douglas-firs and Western Redcedars [Pseudotsuga menziesii; Thuja plicata]. North Lost Lake Tr, Chuckanut Mtns, Bellingham, WA. © Mark Turner Photo: Lost Lake](/wp-content/uploads/2013/03/1200167_HDR.jpg)
HDR photography has gotten a somewhat bad reputation from photographers who overdo the technique and create gaudy, unbelievable images that bear little relation to reality. I prefer to take a more subtle approach, but admittedly it’s a matter of taste. I’ve used the technique both for landscapes and for interior work where there’s a need to see both inside and outside a room.
You’ll find many HDR tutorials online, but the basic technique is to set up the composition, lock the camera down on the tripod, and then make a series of exposures at one-stop intervals so that all brightness ranges in the photo receive a midrange exposure. That usually means shooting from 3 stops above the metered exposure to 3 stops below. Sometimes it doesn’t take that many exposures, but it depends on the scene. I shoot in raw, apply a lens profile and camera profile in Adobe Lightroom, then export all the frames to Photomatix Pro or LR/Enfuse. Mac users can use Bracketeer. Photoshop also includes a Merge to HDR function, but I haven’t been as happy with the results as with the other tools. There’s definitely an art to getting a pleasing result. You’ll have to play with the various sliders and adjustments and you may not get what you want on the first try. There’s no “magic recipe” that works every time, for every image.
Panoramic Composites
I blend two to twenty individual frames together when I can’t fit everything into a single frame. There are a couple of tricks to the process. First, exposure must be consistent for each frame in the series. I use manual exposure and check the exposure across the entire area being photographed, usually choosing the best compromise for the whole scene. Occasionally I’ll combine HDR with a panoramic composite, but that gets complicated.

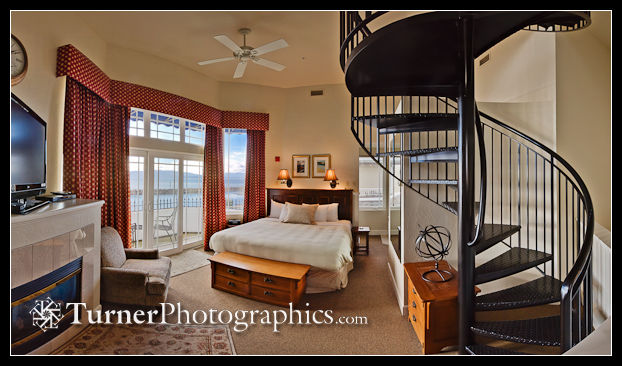
Hotel Bellwether Lighthouse Suite, merged panorama
Second, I take great care to make sure my camera is absolutely level on my tripod. The camera needs to be level both side-to-side and front-to-back or you’ll create a lot of problems for your stitching software. Additionally, I purchased a specialty panning clamp and nodal slide from Really Right Stuff so that I can rotate my camera around the “no parallax point.” That’s particularly important when creating a panorama in a small space, like this interior photographed for the Hotel Bellwether last month.
When photographing a panorama it’s important to overlap each adjacent frame at least a third. Setting the camera vertical lets you include more from top to bottom with the same lens so your finished panorama isn’t quite so skinny in relation to the width.

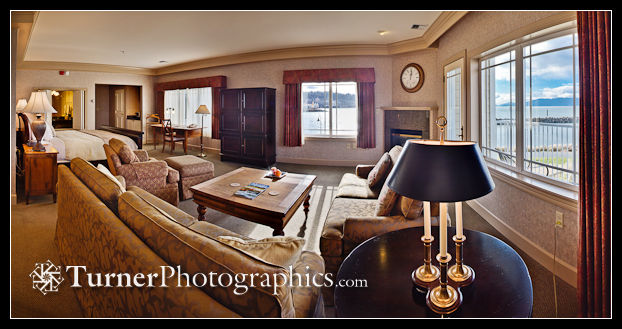
Hotel Bellwether Owner’s Suite, merged panorama
Once I’ve captured all the source frames, I run them through Lightroom to apply a lens profile, a camera profile, and make any exposure adjustments, particularly to the highlights and shadows, to each frame in the series. Then I’ll use either Merge to Panorama in Photoshop or export a set of TIFF files that I process in PTGui. Sometimes one program works better than the other and I may try both before I’m satisfied with the result. I almost always have to crop the finished pano in Photoshop to get rid of curving edges and sometimes have to do a little post-merge cleanup at some of the seams. It really depends on the subject matter and which lens was used.
![1206543 Corteo Peak, North Cascades Panorama [blended panorama]. Okanogan NF Horsefly Pass, WA. © Mark Turner Photo: Corteo Peak in the North Cascades](/wp-content/uploads/2013/03/1206541_Panorama.jpg)
Corteo Peak in the North Cascades, merged panorama
For quickie panoramas, there’s a pretty decent iPhone app called AutoStitch that I’ve used. Results aren’t perfect, but I’ve been generally pleased with the panoramas I’ve made with it. They’re not of the quality I’d deliver to a client, but sometimes it’s just fun to play.
Adding Complexity
You can combine all three of these techniques into a single image, too. It gets complicated, requires a lot of individual exposures, and also requires a fair amount of computing power.
Both of the Hotel Bellwether interiors were created with a combination of HDR and panoramic compositing to be able to hold detail in the bright exterior and the darker parts of the interior and fit the entire room into the frame. They were photographed with a Canon TS-E 24mm tilt/shift lens, with my camera body mounted vertically on my tripod.
If you’re thinking about moving from shooting single frames to blending multiple exposures together, remember that it takes planning and attention to detail. You want as little to change among the frames you’re blending as possible so that the end result hides the evidence of having been done and you’ll spend the least amount of time in front of your computer putting the pieces together. Use manual exposure, use a tripod, keep your lighting consistent, and think about where you want to end up before you start.


Pingback: Turner Photographics | Digital Tip: When One Exposure Is Not Enough | Taking The Picture