Photo Tip: Seeing the Light
Light is the stuff from which pictures are made. Light has color. Light has shape. Light brings the world to life.
So often a snapshooter is concerned only about capturing a fleeting moment. The subject is everything. There’s certainly a lot of value in catching the crack of bat against baseball, the warm embrace of grandmother and grandson, or your triathlete husband crossing the finish line. Those are memories to cherish and your photos help preserve them whether the lighting adds to or detracts from the subject.
Learn to see how light plays across your subjects, how changing your camera position or adjusting the tilt of the face in a portrait impacts your photographs. It doesn’t matter whether you’re shooting with a top of the line digital SLR or the cheapest and simplest disposable like they used to sell in the grocery store checkout line. How you see and work with light to shape, sculpt, and color your subject will help set you apart as a photographer.
Color
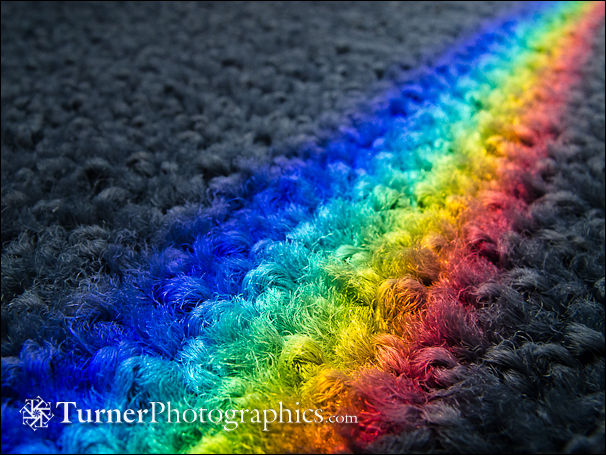
We learned in elementary school that visible light is made up of all the colors in the rainbow. Perhaps you experimented with a prism to split a light beam into those ROY-G-BIV hues.

That’s what’s going on in the photo above. Sunlight came through my window, passing through a glass shelf where it was split into component colors shining on our deep blue carpet.
You’ve certainly noticed that sunrises and sunsets are golden orangey, warm and friendly. Perhaps you’ve heard other photographers, particularly landscape shooters, describe the “golden hour” just after sunrise or just before sunset when sunlight takes on a warm glow.
Have you also noticed that when you’re hiking through a lush forest everything takes on a soft green hue? That’s because the light is filtering through all that foliage overhead.
In open shade, where your subject is shaded but indirectly lit by a brilliant blue sky, you may have noticed a pale blue tint.
We associate colors on the yellow-red end of the spectrum with warmth and positive emotions. Conversely, blues convey cold, but also relaxation and calm. What mood are you trying to create in your photograph? How does the color of the light affect it?
Your camera has a white balance (WB) setting. Maybe you’ve left it on Auto so you don’t have to think about color. Go experiment with the other settings. You can affect the mood of your photo by changing its color tone.
 Daylight (sun icon) is for sunny days or light overcast. At sunset you’ll get those nice warm tones you’re seeing with your eyes. But what if you photograph inside by the light of an incandescent lamp? You may be surprised at how yellow your photo looks.
This portrait of Bailey from her senior portrait session was made late on a sunny afternoon. As the sun drops toward the horizon the color shifts from blue toward yellow. Custom white balance in the camera kept her skin from turning too yellow and unnatural, but the portrait still has a very warm feel. All the colors are in harmony with each other, except for her blue eyes that stand out in contrast.
Shade (shadow of a house icon) is for open shade. This setting compensates for the blue tone from the open sky illuminating your subject.
Cloudy (cloud icon) is for, well, cloudy and heavily overcast days. Similar to open shade, heavy cloud cover filters out a lot of red, leaving blue light falling on your subject.
Fluorescent (tube icon) is for shooting indoors under fluorescent lamps, including both tubes and compact fluorescents. Light from these has a lot of sickly green.
 Tungsten (light bulb icon) is for the light from old-fashioned bulbs, which put out very yellow light. If you use this setting outdoors everything turns blue. Try the tungsten setting at dusk to turn the sky a really rich blue.
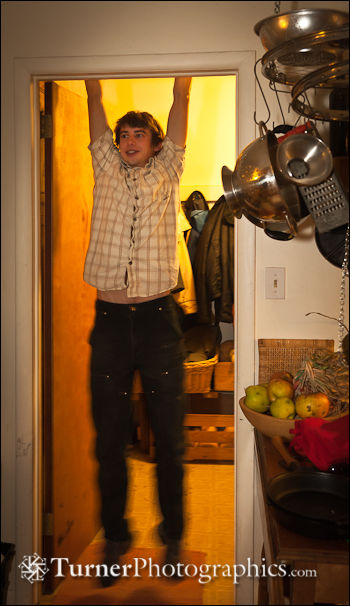
In the photograph at right, notice the very warm yellow color from the tungsten light in the hallway behind my son who is hanging from the doorway. Color balance on the camera was set to daylight and I used an electronic flash to illuminate Zach and the kitchen pots and pans.
Flash is close to daylight so the color of the most important part of the photo looks normal while the background is golden. To the eye, the hallway didn’t look nearly this yellow because our eyes are very adaptable to different lighting conditions and our brain knows what colors objects are supposed to be.
If you’re really concerned about accurate color reproduction, learn how to use the Custom White Balance on your camera. It can be a little complicated, but basically you photograph a white reference and tell your camera to make it neutral. It’s much easier than when we shot film and had to use color balancing filters in front of the lens.
 The overall tone of an image is just one way to use color in your photographs. Color contrast is another technique. Remember the color wheel from your high school art class? Yellow opposite blue, red opposite green? Yellows and reds tend to come forward, to dominate, in a photograph. Conversely, blues and greens recede toward the background.
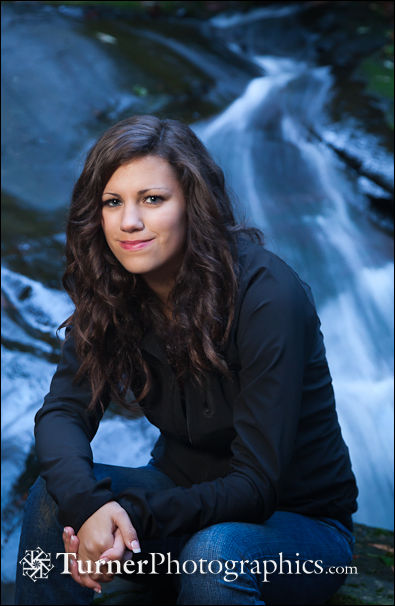
You can use these color principles to increase the illusion of depth in your two-dimensional photograph. It’s sort of automatic when you shoot a red rose against its green foliage, or against a blue sky. But what if you place your portrait subject where her face is illuminated by a tungsten lamp while the background is softly lit by a window? You’ve just created a yellow-blue contrast where your subject comes forward in the viewer’s mind.
In this portrait of Susan, from her senior session last fall at a waterfall along the North Lake Whatcom Trail, flash with a pale amber gel illuminates her face and body while the deep blue late evening sky colors the waterfall behind her. The camera’s white balance was set to daylight.
Next time, I’ll discuss how the direction of the light shapes and sculpts a subject.


Pingback: Digital Photo Tip: Soft and Hard Light – Turner Photographics Newsletter | Turner Photographics