Digital Photo Tip: Take Control of White Balance
You could just leave your camera on Auto White Balance and trust it to get the color right. If you’re photographing people or subjects with something white in the photo it may work pretty well. But you can do better by using your big brain instead of the tiny one in your camera.
First, a little color theory to help you understand what’s going on. Think about the rainbow — red, orange, yellow, green, blue, indigo, violet — with all the colors of the visible light spectrum. Candle light is very orange. Incandescent light bulbs put out yellow light. Fluorescent lights have a lot of green. Daylight is blue-white. Your eyes easily adapt to the different colors of light so you perceive color naturally. Your camera doesn’t do so well.

In Auto White Balance mode your camera is trying to determine what within the frame is supposed to be white and make it white. Sometimes it works pretty well, especially under mixed lighting sources. An example of mixed lighting could be a table lamp with an incandescent bulb and indirect light coming through a window.
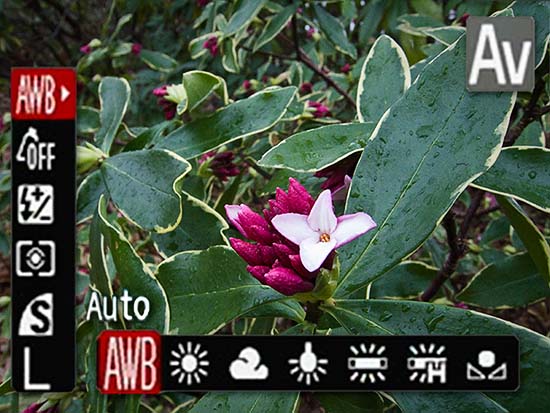
In manual white balance modes you’re telling your camera the approximate color of the light falling on your subject. You’ll get more consistent results and generally better, more accurate color in manual. Here’s when to use each of the manual white balance settings:
Daylight (sun): outdoors on sunny or bright cloudy days. Also use the daylight setting when you want to deliberately accentuate the color of the light source. For example, shooting indoors with the daylight setting will make the scene very warm (yellowish).
Cloudy (cloud): outdoors under heavy clouds. This light has more blue than sunny daylight so the cloudy setting helps keep your subject from looking too blue.
Tungsten (light bulb): indoors with standard incandescent light bulbs. This light is very warm so this setting helps keep your subject from looking too yellow.
Fluorescent (fluorescent tube): indoors under fluorescent lamps, including the new twisty compact fluorescents. This light has a lot of green in it so this setting helps avoid a sickly pallor in your photos.
Flash (lightning): any time your camera’s flash will be the main light source. The color of the light from the flash is similar to daylight so if you’re using fill flash (more on that another month) then I’d stick with the daylight setting.
Some cameras have additional white balance modes, but these are the most common. The other one to know about is Custom White Balance, which gives you the most control but takes more time and effort. I’ll save the details for another installment.
You’ll probably see the most color improvement with manual white balance indoors under tungsten light when photographing people. For landscapes, gardens, and wildflowers daylight or cloudy white balance will give you more consistent results and generally better color. Check your manual to learn how to set white balance on your camera.

